Using the Agent
How to use the agent to generate production-ready infrastructure
Three-Step Workflow
The AI agent generates production-ready infrastructure through three collaborative steps:
1. Describe
Describe your infrastructure needs with detailed requirements
2. Customize
Review and refine the blueprint plan before execution
3. Execute
Guide the agent through deployment with step-by-step validation
Step 1: Describe Your Needs
Describe your infrastructure needs in detail. Upload source code or attach PDFs and images for additional context. Output quality depends on requirement clarity.
Good Requirements
"Set up a highly available web application on AWS using ECS Fargate. Include an RDS Postgres database, Redis for caching, and deploy across multiple availability zones with enterprise-grade security."
Vague Requirements
"Deploy my app to the cloud."
💡 Pro tip: Include cloud provider, region, and specific services you need.
Step 2: Customize the Blueprint
The agent analyzes your requirements and generates a blueprint with step-by-step instructions. Refine the blueprint before execution to ensure high-quality results.
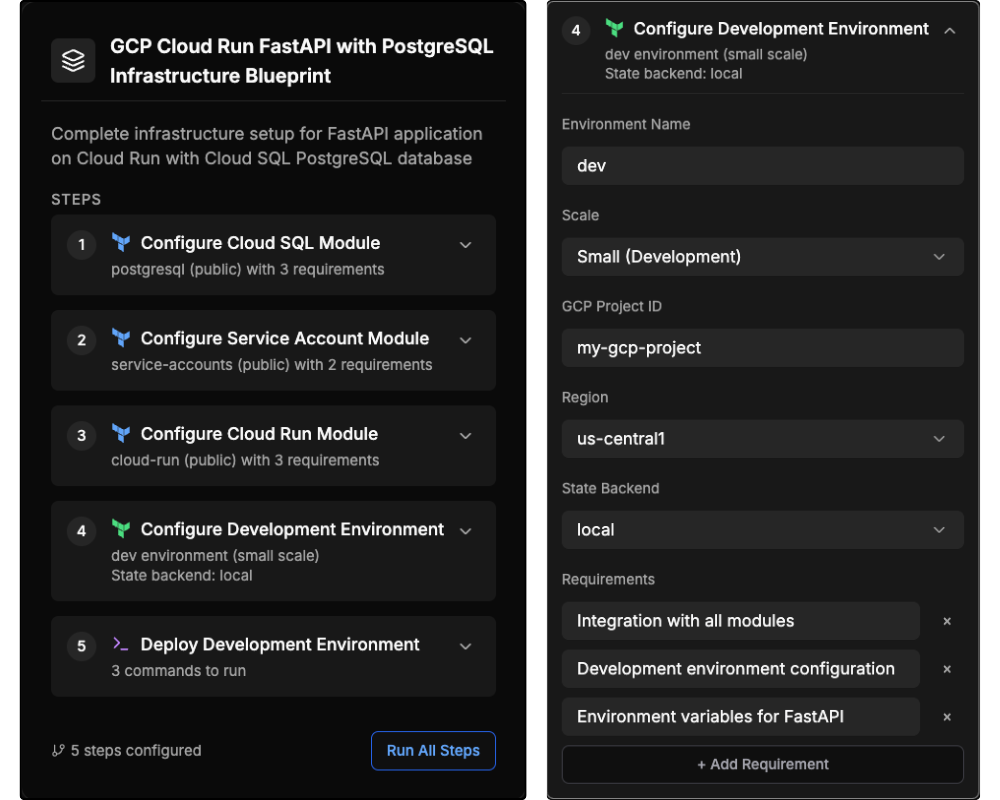
💡 Pro tip: Use custom prompt settings to specify Terraform state storage and defaults like regions and account IDs.
Step 3: Execute the Blueprint
The agent follows the blueprint and pauses after each step for review. Address validation issues and guide the agent to match your specific needs.
Deployment Options
- •Export as ZIP - Download for local deployment
- •Sync to GitHub/GitLab - Push directly to your repository for CI/CD
- •Deploy to Terraform Cloud/Spacelift - Integrate with your IaC platform
Best Practices
Follow these guidelines for optimal results:
Keep conversations focused
Start new chat sessions for unrelated tasks to maintain clarity.
Refine the blueprint
Expand each step to customize the defaults and ensure the output matches your needs.
Use built-in tools
Use cost analysis, documentation reference, and module registry to enhance your workflow.
Using the Agent
How to use the agent to generate production-ready infrastructure
Three-Step Workflow
The AI agent generates production-ready infrastructure through three collaborative steps:
1. Describe
Describe your infrastructure needs with detailed requirements
2. Customize
Review and refine the blueprint plan before execution
3. Execute
Guide the agent through deployment with step-by-step validation
Step 1: Describe Your Needs
Describe your infrastructure needs in detail. Upload source code or attach PDFs and images for additional context. Output quality depends on requirement clarity.
Good Requirements
"Set up a highly available web application on AWS using ECS Fargate. Include an RDS Postgres database, Redis for caching, and deploy across multiple availability zones with enterprise-grade security."
Vague Requirements
"Deploy my app to the cloud."
💡 Pro tip: Include cloud provider, region, and specific services you need.
Step 2: Customize the Blueprint
The agent analyzes your requirements and generates a blueprint with step-by-step instructions. Refine the blueprint before execution to ensure high-quality results.
💡 Pro tip: Use custom prompt settings to specify Terraform state storage and defaults like regions and account IDs.
Step 3: Execute the Blueprint
The agent follows the blueprint and pauses after each step for review. Address validation issues and guide the agent to match your specific needs.
Deployment Options
- •Export as ZIP - Download for local deployment
- •Sync to GitHub/GitLab - Push directly to your repository for CI/CD
- •Deploy to Terraform Cloud/Spacelift - Integrate with your IaC platform
Best Practices
Follow these guidelines for optimal results:
Keep conversations focused
Start new chat sessions for unrelated tasks to maintain clarity.
Refine the blueprint
Expand each step to customize the defaults and ensure the output matches your needs.
Use built-in tools
Use cost analysis, documentation reference, and module registry to enhance your workflow.